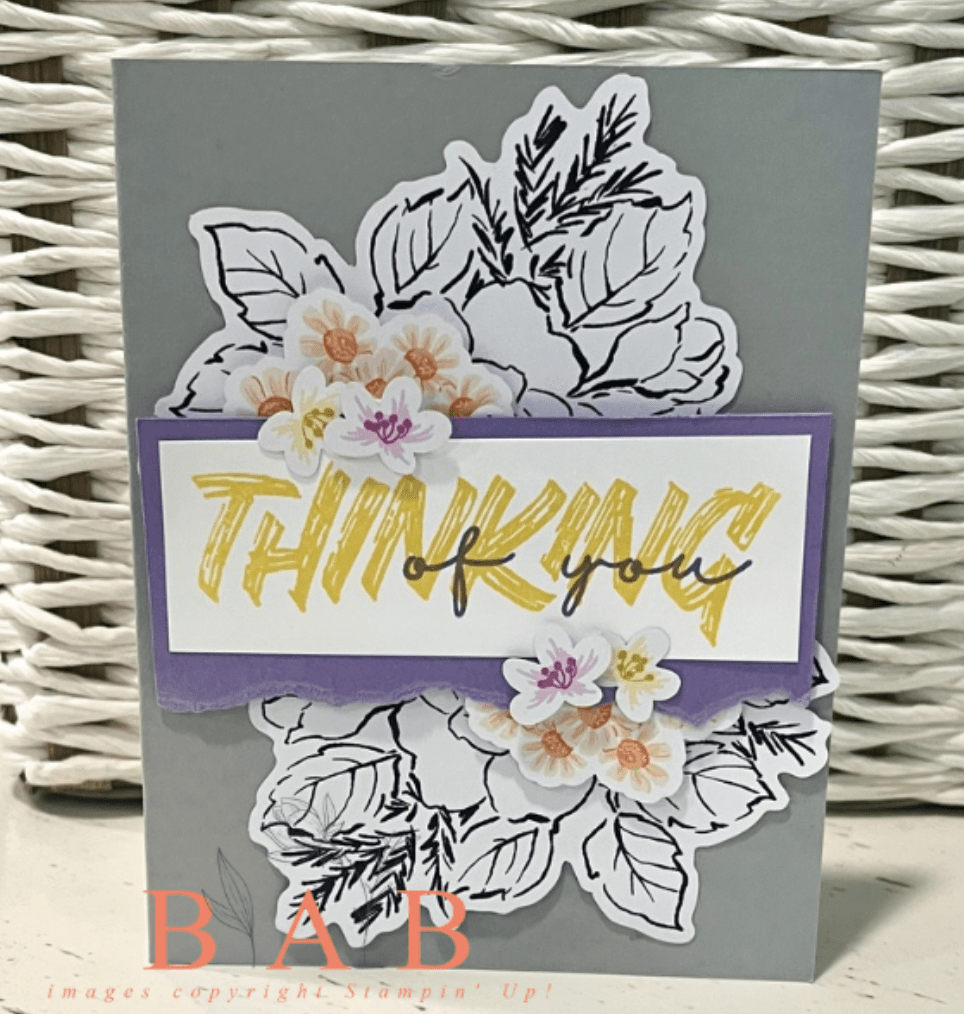
Happy Tuesday! Today’s card is another one that uses pieces from an ephemera pack along with a large sentiment. You can see it on page 34 of the catalog. I love the ease of punching out images and attaching them to a card. The black and white pieces add a great background for the greeting and the small flowers add just enough pop of color. The only stamping on this card is the sentiment which comes from the Layered Thoughts stamp set.
Hope you will come back tomorrow for another fun card using ephemera!
Along with a few of my demonstrator friends, I am CASEing (copy and share everything) 30 of the projects featured in our catalog. We’ve put together recipe cards with all the dimensions to make the projects easy for you to make, too. I hope that you will play along, it’s going to be a fun month. At the end of each week, I will send out the recipe cards for that week’s projects to my email list. If you are not on my email list, now is the time to join. All you have to do is click the lime icon over on the right side of this page.
With all the project samples and ideas that you can find on the internet, there is an important resource that often gets overlooked. Stampin’ Up!’s Annual Catalog is full of beautiful projects and I am so excited to share 30 of them with you this month. Along with a few of my demonstrator friends, I am CASEing (copy and share everything) 30 of the projects featured in our catalog. We’ve put together recipe cards with all the dimensions to make the projects easy for you to make, too. I hope that you will play along, it’s going to be a fun month!
Each day, you can see the featured project on my Facebook page but if you want details and tips, you will need to come here to my blog. At the end of the week, I will send out the recipe cards for that week’s projects to my email list. If you are not on my email list, now is the time to join. All you have to do is click the lime icon over on the right side of this page.
Let’s jump in…
Today’s card was a really hard one for me. I was tempted to add more to it. It has no ribbon, no twine and no bling. How is that even possible?! I consider myself a pretty simple stamper but this one was even simpler than what I usually make. Funny thing is that once I got past the urge to stick something else on it, I love how it turned out.
You can find this card on page 35 of the annual catalog. I did have to use a different greeting because I ordered the wrong ephemera pack but I still like how it turned out.
If it weren’t for doing this challenge, I would not have ordered this Congrats stamp but I can’t tell you how glad I am that I did. It’s that stamp that I always need and NEVER have. It stamps great and is big enough to be a focal image. It’s perfect for graduation, new baby, engagement, promotion at work and the list goes on! It’s stamped in Crushed Curry on Daffodil Delight here and I love how it pops just enough.
Have you played with any of the ephemera packs? I love these cute little books and the heart that I added on top of them. I’ve always been a sticker girl so these just make my heart happy. They are sticky on the back so you can add them that way or you can rub them on your pant leg to get rid of the sticky and pop them up on dimensionals.
We’re only on day 2 and I’m already using things that I wouldn’t have used on my own. Makes me realize that my go-to stash is quite limited.
I’ll start by saying that I love this layout! It is my go-to and easiest by far when I am not feeling too creative. These pocket pages just make it easy. The formula for this page is a 4×6 photo in the big pocket, journaling in one of the small ones and coordinating DSP in the other small one. I made a tag to attach the 4 to and voila, all done!
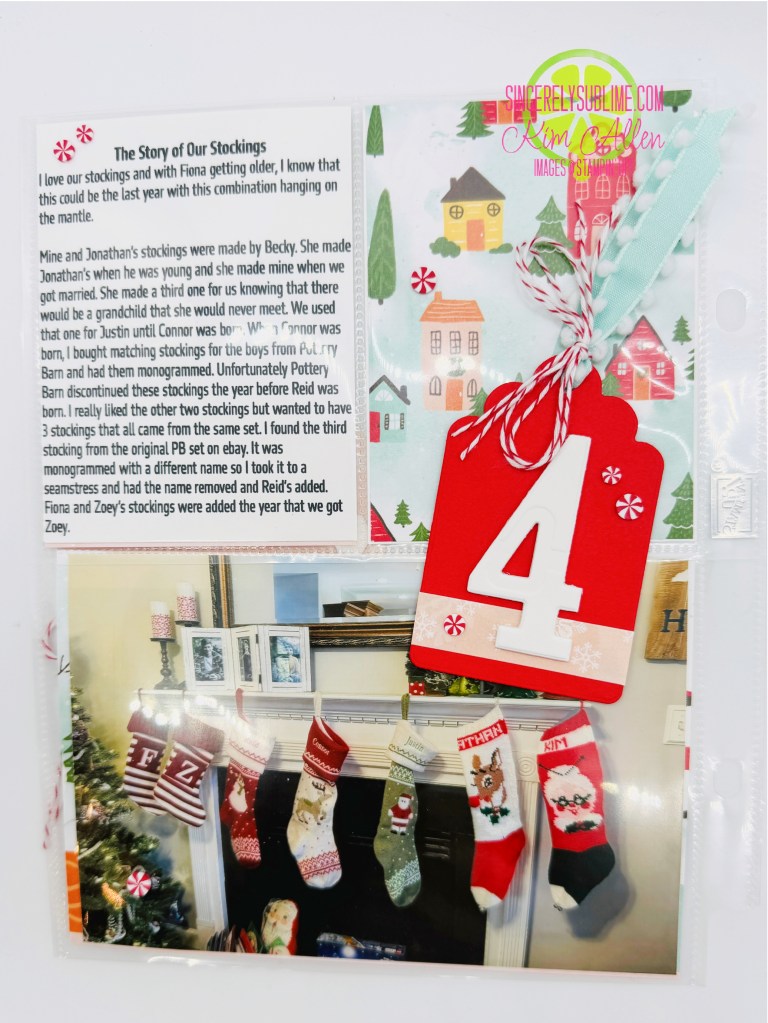
I used to really care about the decorations and making the page pretty. I used to spend hours on pages and then leave no room for journaling. As I look back on those pages, I wish that I had journaled more because I don’t remember the story. The purpose of this page is telling the story of our stockings. Our mantel has looked this way for many years and I’m realizing that it won’t always. As the boys get older, we’ll add stockings but the more imminent thought is a sad one and I wanted to make sure that I remembered when there was an F stocking hanging there. Fiona, our sweet cat, is 14 this year and getting ready to turn 15. She loves Christmas morning when we open up her stocking and she gets little mice full of catnip.
You have lots of Christmas stories to tell and I would love to have you join me for my first scrapbooking class in the new year. We’ll be creating some Christmas pages. If you have never scrapbooked before, this is the perfect time to get started. Holiday photos make it easy especially with the formulas that I will teach you. Mark your calendars for January 31st and come scrapbook with me. I’ll be sending out details through email, make sure you are on my email list.
For my third page, I decided to go with something that related to Giving Tuesday. Connor has gotten involved with Camp Kesem at UNC and participated in the fundraising goal that Carolina established. I love how this page turned out because it is an example of a page that requires absolutely no photos yet tells an important story of the season.
Not only is there no photo, but there is no journaling either. I used a standard pocket page with the 3″x4″ pockets on the top and a 4″x6″ pocket on the bottom. For the top pocket, I took a screenshot of the Facebook post that Connor wrote for his fundraising efforts. On the bottom, I printed out his goal along with what he accomplished. These are just screenshots taken right from the website and printed onto Basic White cardstock. I added DSP and a couple of the sticker strips from the scrapbooking kit and put everything in the pockets.
Before I explain what I did next, it’s important that the back side pockets are filled before this step. Just know that all 3 pockets for day 4 are filled and ready to go. I find sometimes that when you only focus on filling the pockets in the traditional way, the pages feel flat. I love to add elements to the top of the page which gives some dimension. For this page, I wanted to add a snowglobe but it is too big for a pocket. I cut it out from the DSP using the dies and attached it to the plastic page using dimensionals and then tied a double bow of baker’s twine and added it with a small dot of glue. I then added some of the Peppermint embellishments. If you know me, you are well aware that I look for any opportunity to add these adorable swirled dots!
I always struggle with the journaling. I know that it’s important to have it but sometimes it’s what keeps me from getting it done. The page I’m sharing today is one of those. I kept trying to decide what to write and just decided that it didn’t need a story. It’s presence in my album is all that it really needs.
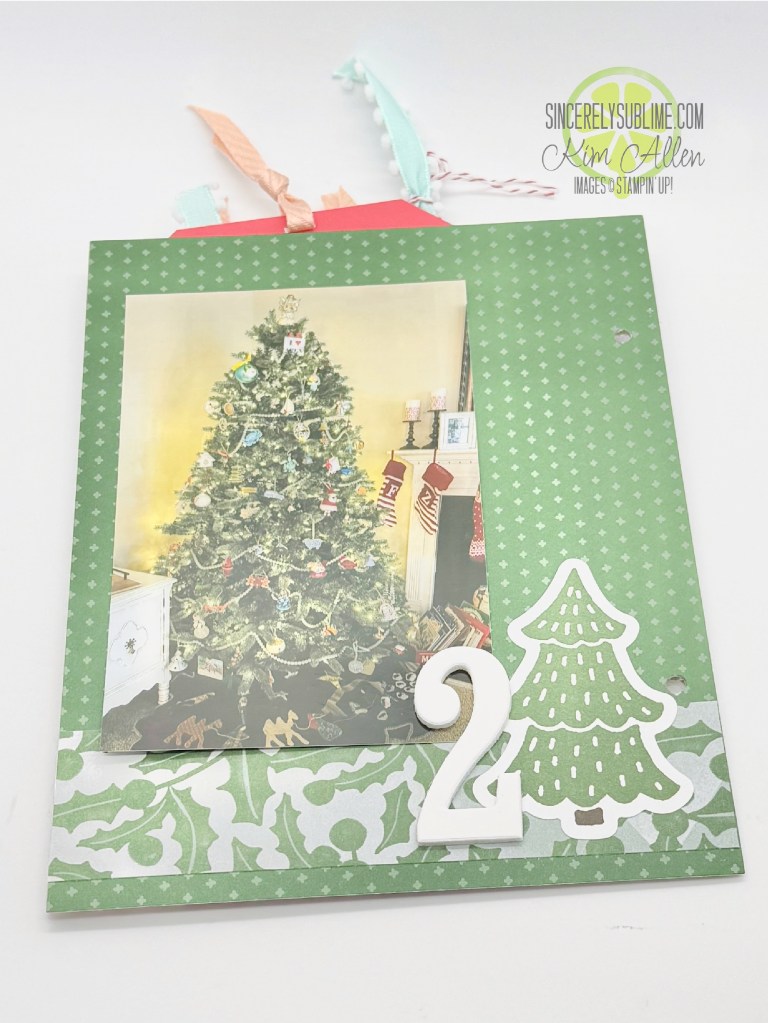
Day 2 is our Christmas tree. Sure, there are stories I could tell but none would compare to the year that Justin plugged his phone charger into the tree because he was too lazy to move to a different outlet. It blew out the whole middle section of lights requiring us to purchase this one. That was years ago so the story isn’t relevant. I kept trying to come up with a story and decided that I was just going to do the page without one and if there ended up being a story to tell at some point during this season, I would add it in then. For now, the page is complete!
This is the backside of the first page. I covered the chipboard with DSP and then a strip of the holly print across the bottom. Added a sticker, my foam number and the photo and it’s done. I hope the simplicity of this page inspires you to get to work. Quick and simple is perfectly acceptable!
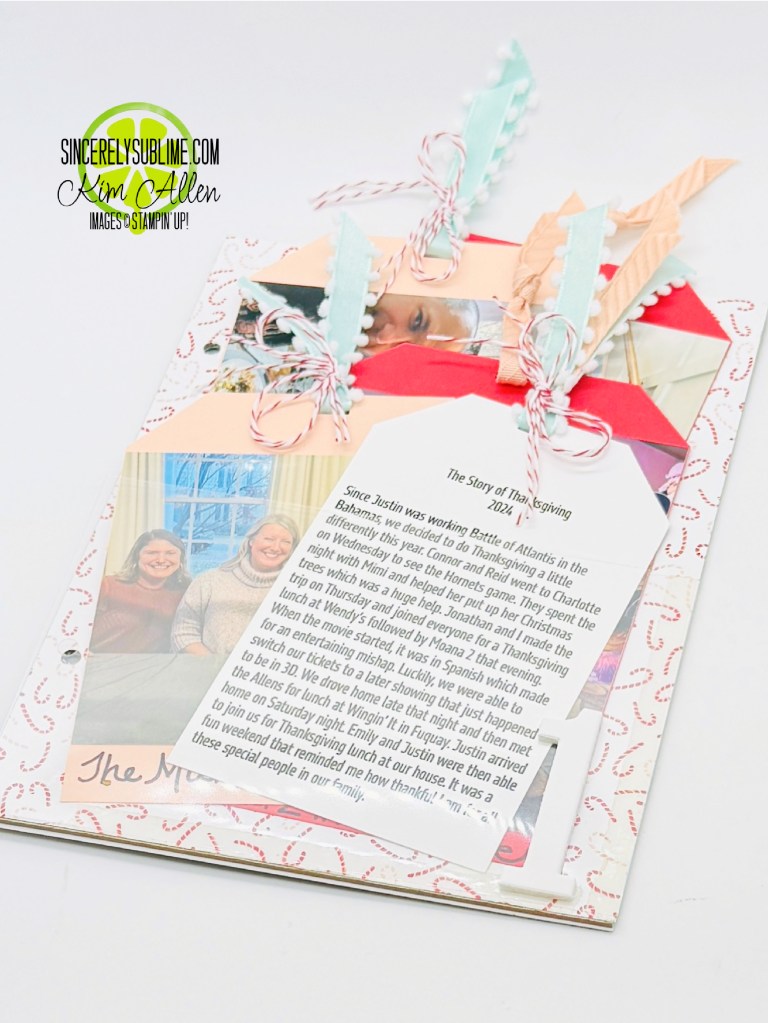
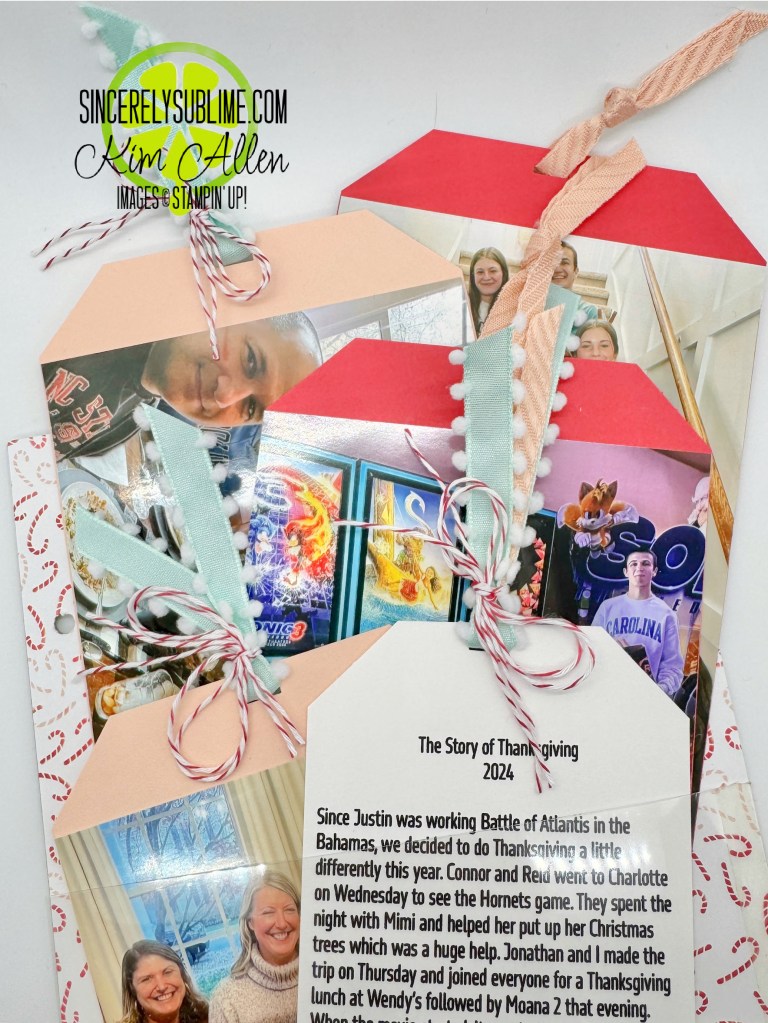
I’m so excited to share the first page of my book. With Thanksgiving being so late this year and our actual family dinner happening on December 1st, I decided to focus on Thanksgiving weekend as the first page.
There were a lot of photos that I wanted to share so I decided to do a pocket page and turn each of the four photos into tags that could be pulled out and looked at. The fifth tag is the story of our weekend so that I will remember all the fun of being with family, especially how we ended up in a Spanish showing of Moana 2.
The pocket page is a fun way to display more than one photo without having to print them too small. To create this page, I simply took the cardboard from a specialty pack of DSP and cut it down into a 6″x 8″ piece. I then covered the front and back using DSP. For the front, I covered it with the candy cane print. To make the pocket, I cut a layer of window sheet into a 4″ x 6″ piece and then attached to the page using a piece of tear and tape across the bottom and down the right side. I left the left side open so that there would be room for give and the pocket wouldn’t be too tight. I used a hole punch to put two holes right where the binder rings go through. Since one of the holes incorporates the window sheet, it will keep the tags from falling out of my book.
For the number 1 at the bottom, I pulled out my retired number dies and cut them using white cardstock and a foam sheet. I love the number standing out a little bit from the page. The foam sheets are perfect for giving it dimension.
I also covered the back of the page with DSP which you will get to see tomorrow when I share day 2. It’s not too late to jump in and create your own album this year. I would love to help and inspire you!
A few years ago, I took up the practice of creating a December Daily album which includes 25 pages that document the days leading up to Christmas. I love the idea of capturing the traditions, stories and little moments that wouldn’t be remembered unless documented somewhere. I learned about this from Ali Edwards who is the absolute guru when it comes to creating these albums. You can see LOTS of ideas on her website.
With our new focus on scrapbooking, I’ve decided to create this year’s album using Stampin’ Up! products. I will only be using one scrapbook kit and DSP pack so that all the colors coordinate. I will be bringing in stamp sets and embellishments to add to the stories and photos that I am sharing but my focus will be the Snow Day Scrapbooking Workshop Kit. If you would like to create with me and reproduce my pages, you can buy the scrapbooking kit, DSP pack and other products right from my store. All the links can be found below.
I thought it would be fun to share some of my favorite pages from years past. Keep in mind, some of these pages were made with non-Stampin’ Up! products and the others use products that are now retired. I’m just showing you some of the concepts that I have used in the past. I look forward to recreating these same concepts using the scrapbooking kit and coordinating products. I hope you will come back to see my progress and the pages that I create.
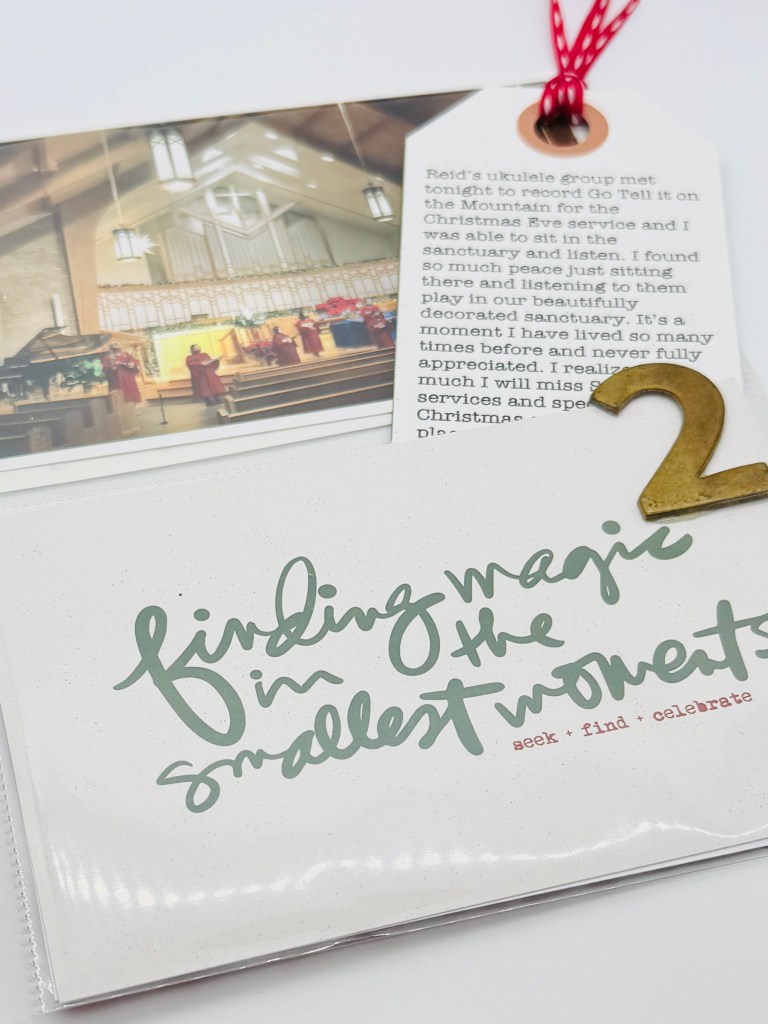
This page is one of my favorites. If all I had was the photo, I would not remember how I felt when I took it. The story is on the tag and is from 2020. Reid’s ukulele choir had just rehearsed and recorded a song to be included in the virtual Christmas service due to the pandemic. I sat in the sanctuary that night overcome with the sadness that I would not be celebrating Christmas in this place with the people who I see as family. It was a sad moment and I realized how much I had taken that opportunity for granted every year. This layout is one of my favorites due to the simplicity. It’s a 6×8 pocket page with room for a 4×6 in the top and another in the bottom. It’s so easy to put the photo in one pocket, embellish the bottom pocket and include a tag for the story that can be pulled out and read.
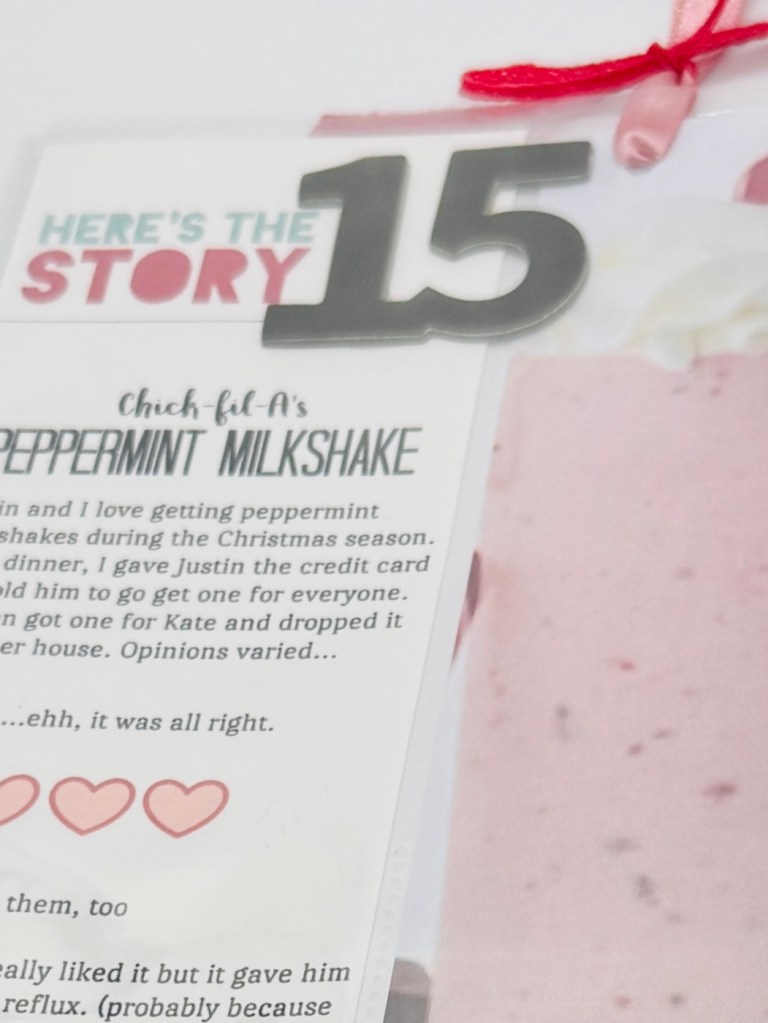
This page was a fun one. It was a picture of Chick-fil-a’s Peppermint Milkshake on the right with everyone’s opinions on the left side. We picked up milkshakes one night and I wrote down everyone’s thoughts.
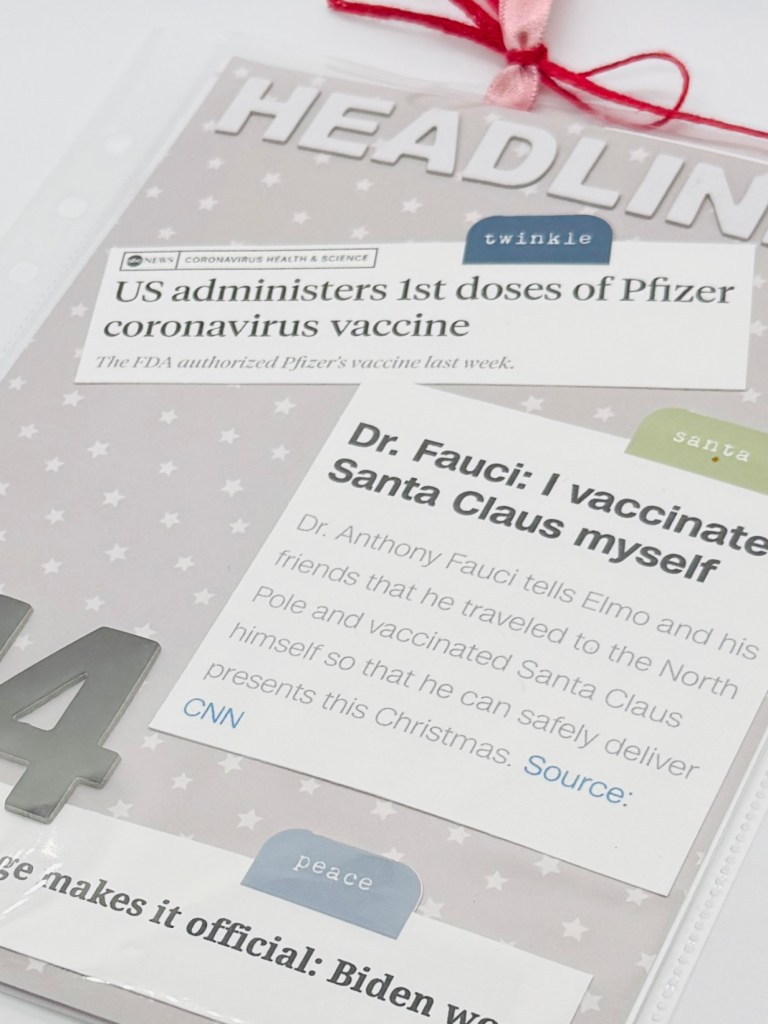
Your pages can be personal stories or you can add in pages with what’s going on around you. I like this page because it is another one from 2020. I thought it would be neat to look back on some of the headlines that were in the news.
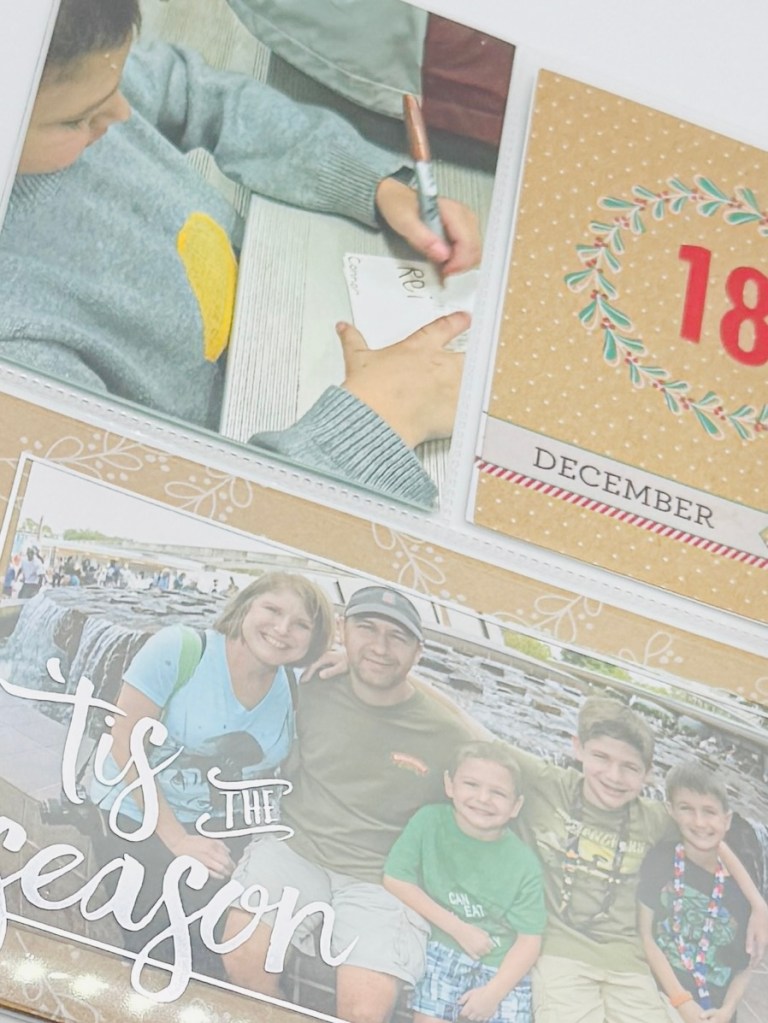
I’m taking you way back to 2016 with this next one. Reid was 6 and in the photo is writing his name. This was the one and only year that I made all the boys sign their names in our Christmas card. Thank goodness Reid’s name only had 4 letters! The photo at the bottom is the one I included in our Christmas card that year.
On December 1st, I will start sharing my 2024 pages. I would love for you to craft with me. Any of the products below can be purchased in my Stampin’ Up! store using the link on the side or feel free to contact me if I can help you with your scrapbooking this December. It’s fun to get these stories documented and I promise that you will love looking back at them in the future.
When I saw this card sketch over on the Freshly Made Sketches site, I knew what I wanted to do.
I love the new in-colors, they’re bright and fun and the names make me smile. To make the banner, I just cut a long 2″ strip of Basic White cardstock. If I had to guess a length, I’d go with 8ish inches so that you have enough covered to be able to trim it to the needed length. I cut 1/2″ strips of all the colored dsp strips and attached them to the long strip of Basic White. I cut the end into a banner and attached it to a white layer before attaching it to the card. I love the white space, it makes the Polished Pink gems stand out.
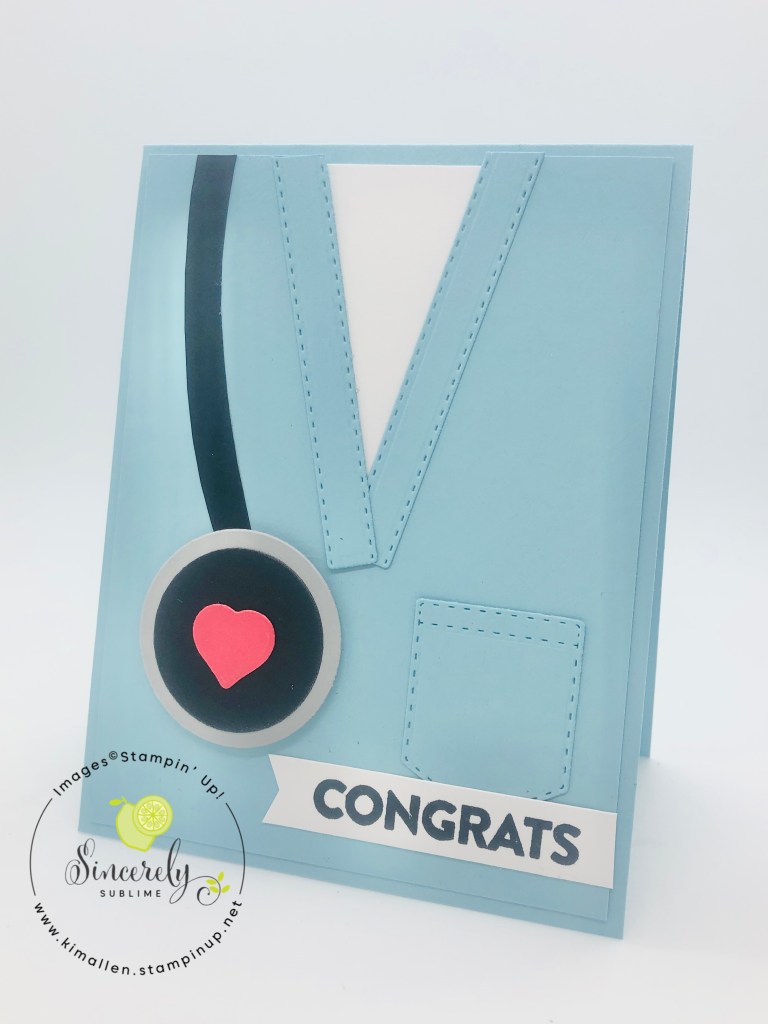
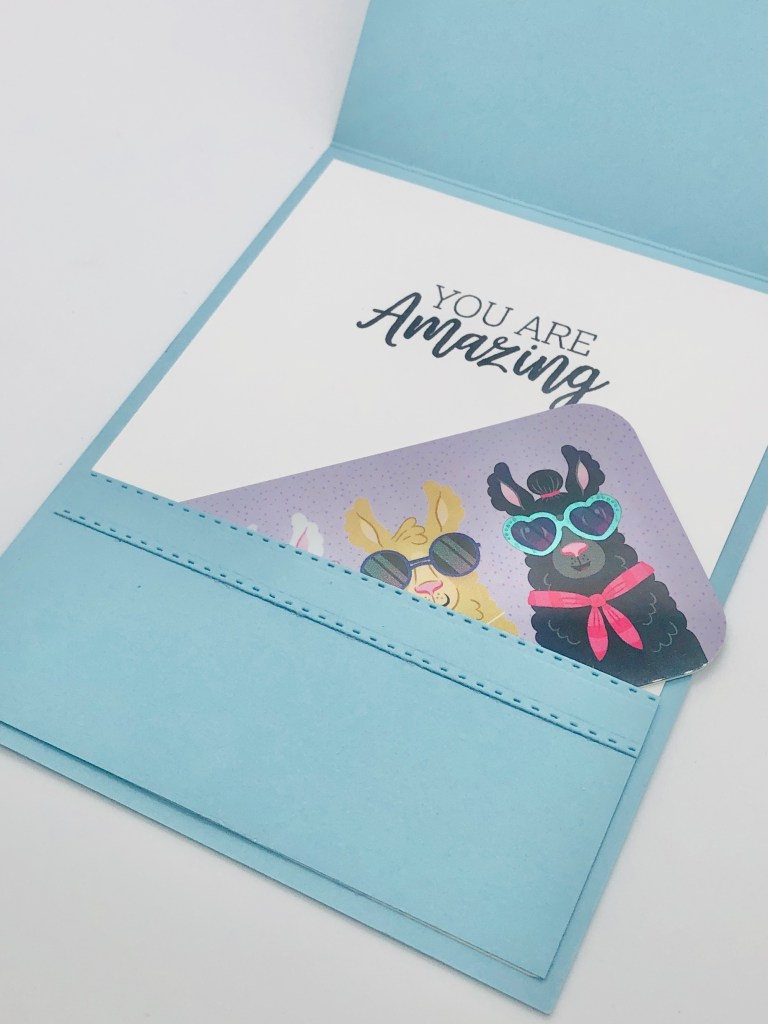
Since my niece just graduated from nursing school and is heading into the NICU at UNC Hospitals, I decided that her graduation gift needed to be nestled inside one of the cute cards that I have seen so many demonstrators make. Using the Suit & Tie Dies, I made her a scrubs card in Carolina Blue. For all the details, you can watch the video. If you want to make this card and need any supplies, I have included links with each supply item listed.
I even added a fun little inside so that a gift card could be added.
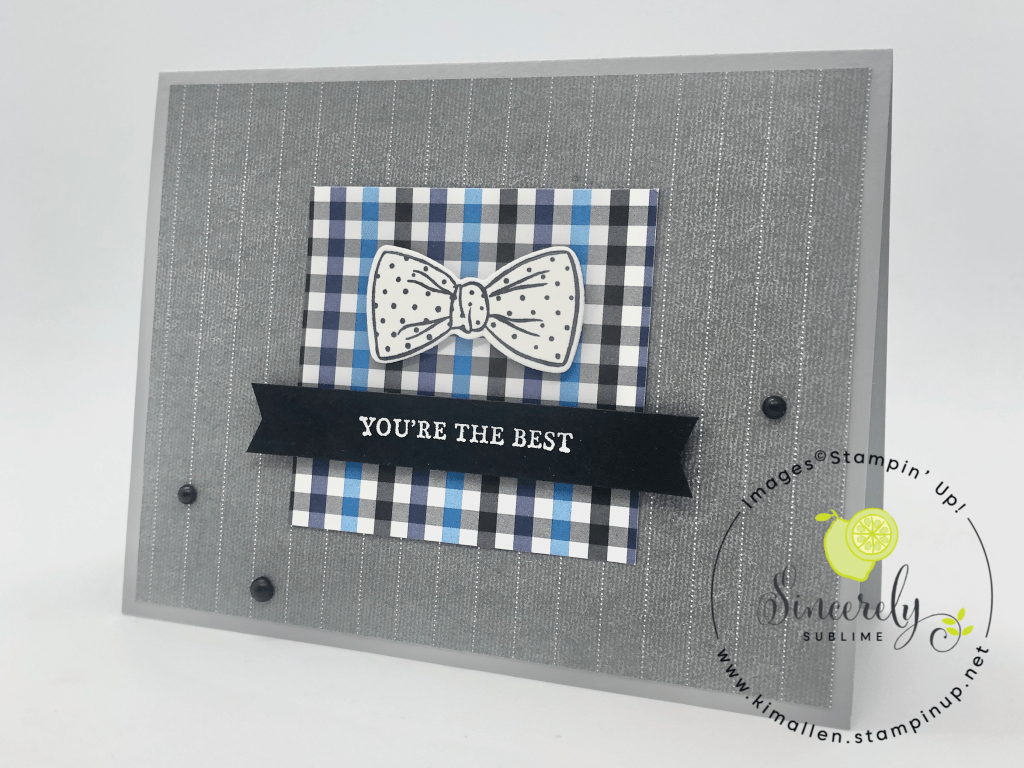
I am having so much fun with this stamp set! I usually struggle with making masculine cards but this stamp set combined with the Well Suited Designer Series Paper make it really easy. I found some fun card sketches and decided to play around with a few of them. The sketch over at Fab Friday was my favorite and I love how this simple card turned out.
I always tend to use a white piece and stamp on it for the focal image but decided to go with the patterned paper and punch out the cute little bow tie for the focal piece. I’ve also been grabbing my heat tool a lot lately to do sentiments in white embossing powder on Basic Black cardstock. And, let me tell you, those Black Matte Dots may be one of my favorite things. I was so excited when I saw that they would be continuing into the new annual catalog.
If you want to try out this card, all the needed supplies are listed below and can be purchased right from my online store. I would love to have the opportunity to help you with your stamping needs.

![Smoky Slate 8-1/2" X 11" Cardstock [ 131202 ]](https://assets1.tamsnetwork.com/images/EC042017NF/131202s.jpg "Smoky Slate 8-1/2\" X 11\" Cardstock [ 131202 ]")
![Highland Heather 8-1/2" X 11" Cardstock [ 146986 ]](https://assets1.tamsnetwork.com/images/EC042017NF/146986s.jpg "Highland Heather 8-1/2\" X 11\" Cardstock [ 146986 ]")
![Layered Thoughts Photopolymer Stamp Set (English) [ 165346 ]](https://assets1.tamsnetwork.com/images/EC042017NF/165346s.jpg "Layered Thoughts Photopolymer Stamp Set (English) [ 165346 ]")
![Fully Flowering Mix & Match Ephemera Pack [ 163762 ]](https://assets1.tamsnetwork.com/images/EC042017NF/163762s.jpg "Fully Flowering Mix & Match Ephemera Pack [ 163762 ]")
![Basic White 8 1/2" X 11" Cardstock [ 166780 ]](https://assets1.tamsnetwork.com/images/EC042017NF/166780s.jpg "Basic White 8 1/2\" X 11\" Cardstock [ 166780 ]")
![Daffodil Delight Classic Stampin' Pad [ 147094 ]](https://assets1.tamsnetwork.com/images/EC042017NF/147094s.jpg "Daffodil Delight Classic Stampin' Pad [ 147094 ]")
![Gorgeous Grape Classic Stampin' Pad [ 147099 ]](https://assets1.tamsnetwork.com/images/EC042017NF/147099s.jpg "Gorgeous Grape Classic Stampin' Pad [ 147099 ]")

![Simple Congrats Photopolymer Stamp Set (English) [ 165344 ]](https://assets1.tamsnetwork.com/images/EC042017NF/165344s.jpg "Simple Congrats Photopolymer Stamp Set (English) [ 165344 ]")
![Blueberry Bushel 8-1/2" X 11" Cardstock [ 146968 ]](https://assets1.tamsnetwork.com/images/EC042017NF/146968s.jpg "Blueberry Bushel 8-1/2\" X 11\" Cardstock [ 146968 ]")
![Daffodil Delight 8-1/2" X 11" Cardstock [ 119683 ]](https://assets1.tamsnetwork.com/images/EC042017NF/119683s.jpg "Daffodil Delight 8-1/2\" X 11\" Cardstock [ 119683 ]")
![Crushed Curry Classic Stampin' Pad [ 147087 ]](https://assets1.tamsnetwork.com/images/EC042017NF/147087s.jpg "Crushed Curry Classic Stampin' Pad [ 147087 ]")
![Good Times Mix & Match Ephemera Pack [ 165353 ]](https://assets1.tamsnetwork.com/images/EC042017NF/165353s.jpg "Good Times Mix & Match Ephemera Pack [ 165353 ]")
![Greetings For All Mix & Match Ephemera Pack (English) [ 164862 ]](https://assets1.tamsnetwork.com/images/EC042017NF/164862s.jpg "Greetings For All Mix & Match Ephemera Pack (English) [ 164862 ]")


")
 Designer Series Paper")


 Designer Series Paper")


")

